Particle physics is the original big data field, and science in general produces some of the largest datasets in the world. The desire to store, transfer, and process particle physics data has driven the development of large, distributed computer clusters and the internet itself. Underpinning all of this is the ability to store and access the data produced by experiments and simulations. Many technologies exist to facilitate this, including tape drives for long-term archival, solid-state drives for high-bandwidth data storage, and the venerable hard disk drive that falls somewhere in between tape and solid-state. To store large, petabyte-sized datasets, thousands and thousands of individual drives are used together to provide redundancy for failure of individual drives, fast access to any particular part of a dataset, and enough raw storage to hold entire datasets.
At smaller scales than the LHC at CERN, like small compute sites, particle physics experiments still have data storage requirements in the range of hundreds of terabytes. A particle physics research group at a large university is a good example of such a small compute site. It is customary for a group to have enough computational power to meet their data analysis needs (O(100) CPU cores) along with the storage for the data or results (O(100) TB). The computational power is typically delivered by cutting-edge custom built machines combined into a small cluster, using software like Slurm to distribute computational load to the many machines. To make the separate machines into one cohesive unit, they are configured similarly, either with brute-force or something like Puppet, and network-attached storage (NAS) is connected to all by a fast network to give them a common file system.
Inevitably, as time and technology progress, upgrades are required to meet new computational demands and replace machines lost to hardware failure. With the recent explosion in hard drive capacity and GPU compute power (a topic for a future post) lining up with grant-renewal, now is the time for upgrades! The compute cluster for the Neutrino group at UPenn was nearing 90% storage capacity, and instead of cleaning up old unused data, the obvious solution is to add more space.
The existing storage solution
The neutrino group’s cluster at UPenn already has three enterprise grade DELL PowerEdge T640 disk servers, along with several smaller (and older) disk machines. These T640 servers are complimented with 16x 4TB hard drives in RAID-6, yielding around 50 TB of usable storage each. RAID is a hardware (or software) method of spanning a single filesystem across multiple disks, which is critical when working with datasets that are typically larger than any single storage device one could purchase. Here the hardware RAID is managed by Broadcom-based RAID cards included with the T640s, and the MegaCli software provides a (convoluted) way to monitor and diagnose the disks. Two of the drive bays have smaller hard drives in RAID-1 for the server’s operating system, which was probably a good idea considering these machines are pretty old, and one of the drives could fail any time. RAID-1 essentially duplicates the data to two drives, so if one fails, it can be replaced without having to even take the system offline.
Failure probability is the primary driver for the choice of RAID-6 over RAID-5, as RAID-6 has enough redundancy to support two failed drives. This redundancy comes at a cost: the usable space for drives in RAID-6 is times an individual drive’s capacity. On a large array, with 16x 4TB drives, the chance of another drive failing while the redundant data is copied to the replacement for a failed drive is not negligible. “Enterprise-grade” hard drives typically have lower failure probabilities than “consumer-grade” (read: cheaper) drives, but these disk machines are now a mix of the two to keep things interesting.
These machines run a too-old version of Ubuntu, and serve up their 50TB RAID-6 volumes via NFSv3. This allows the machines in the cluster that do the actual work to mount the large filesystems over the network. Typically (though not always) physics analysis workloads are CPU-bound instead of IO-bound, meaning much more time is spent performing local computations than reading or writing data to disk. Because of this, we get away with only a copper gigabit ethernet network to bind this all together, and can effectively add infinite storage capacity by adding more disk machines. General-purpose compute sites are not so lucky, and need fast interconnects like Infiniband between compute and storage, and a well-thought-out network topology to avoid bottlenecks, which can drive costs up substantially.
To make sure someone realizes a disk has failed, a central machine in the cluster runs Nagios which periodically checks the system status of all machines, and alerts the group via slack messages (and email) if something goes wrong. RAID-6 is the savior here, because it often is a while before anyone goes to swap out a disk!
Maybe there’s a better way?
DELL PowerEdge T640s are OK, but only OK. I’ve certainly worked with harder-to-manage home-brewed systems, but MegaCli is a huge pain, and I have to work with it infrequently enough that there’s a steep learning curve every time I want to replace a disk. More importantly, our use case doesn’t require the “Enterprise” features offered by (and justifying the price of) the T640s.
- Redundant power supplies? Not a single power supply has failed in these T640s, and if one did, we’d just deal with the downtime while a new one is ordered, or even better have one spare on hand to replace it.
- Remote management interface? I honestly don’t even know how to use it, and haven’t needed to. The server room is across the hall from my office.
- Hot swapable drives? I’ll grant, this is a nice feature, but do we need it? Not really: NFS mounts will just hang if the if the server goes offline, and probably no one will notice this for the time it takes to put a new drive into a machine.
- 10 gbit ethernet? We’re currently only using 1 gbit as it is.
- The ability to install Ubuntu (or any custom OS) or run arbitrary programs? Honestly, if it just turns on and runs an NFS server, it meets 100% of our requirements.
- The DELL logo? No thanks.
Considering DELL will gladly sell you a T640 with 18x 4TB drives for around $8000 now, I can only imagine how much this setup costed ten years ago. As it stands, there are certainly cheaper, easier to setup, consumer options available, and Synology seems like the only name in the game right now.
A Synology NAS (or two)
To expand our storage, and in light of Enterprise features not being a requirement, I opted to go with two Synology DS2419+ 12-bay disk stations, which will be fully populated with 8TB Seagate 8TB Exos drives (ST8000NM0055), which with current prices is around $8000. The baseline plan is to have 11 drives in RAID-6 (72TB usable) with one hot spare in each twelve bay enclosure. Right off the bat there are two significant improvements for our use case over the DELL T640s:
- More than double the usable storage for the same cost, with the same redundancy!
- A hot spare, to reduce the pressure of needing to go replace a drive as soon as it fails.
Synology made the interesting choice to install the semi-proprietary DSM operating system (its some Linux under the hood) to a small segment of all drives in the enclosure, which means you do not have to dedicate one bay (or more, for redundancy) to the operating system. This lets all 12 bays be utilized, making me feel much better about leaving a hot spare.
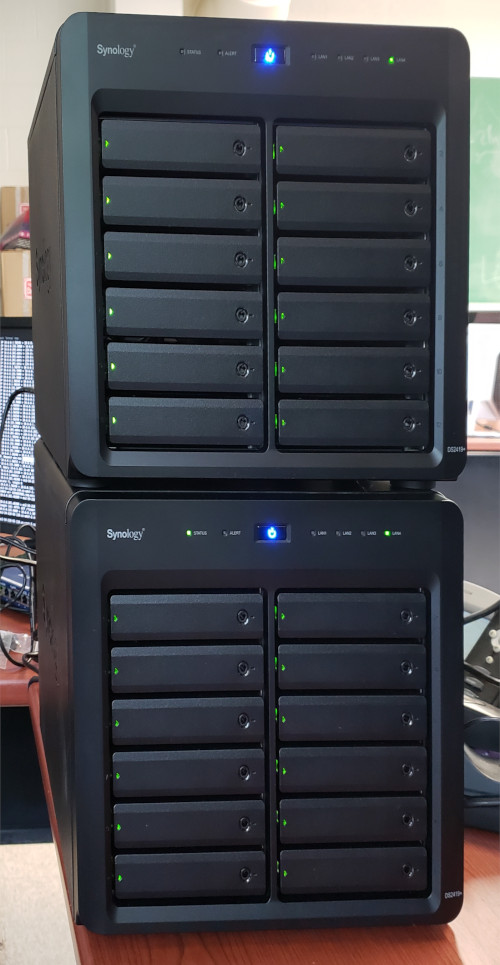
The Synology DiskStation NAS immediately after power-on
All in all, it took more time to unpack the 24 hard drives than it did to get the Synology device setup and in a usable state. After installing all drives and connecting the enclosure to the local network on my desk, all that was required is navigating to the nicely-polished web interface, which prompted me to create an admin account, and install the DSM operating system. From there, I moved the to-be-configured NAS to the server room, and connected it to the cluster’s local network to be configured remotely (as we’re still nominally working remotely due to Covid-19).
Disk configuration
I prefer to work with terminal commands in most situations, because I find GUIs to be a limiting factor.
That said, Synology’s web interface is clearly very mature, and does not require any expert knowledge.
There was considerable effort put into making the web interface look like a modern Linux desktop, and it was straightforward to setup the RAID-6 configuration I desired with the “Storage Manager”
The DSM web interface showing the Storage Pool setup using 11 drives with a hot spare.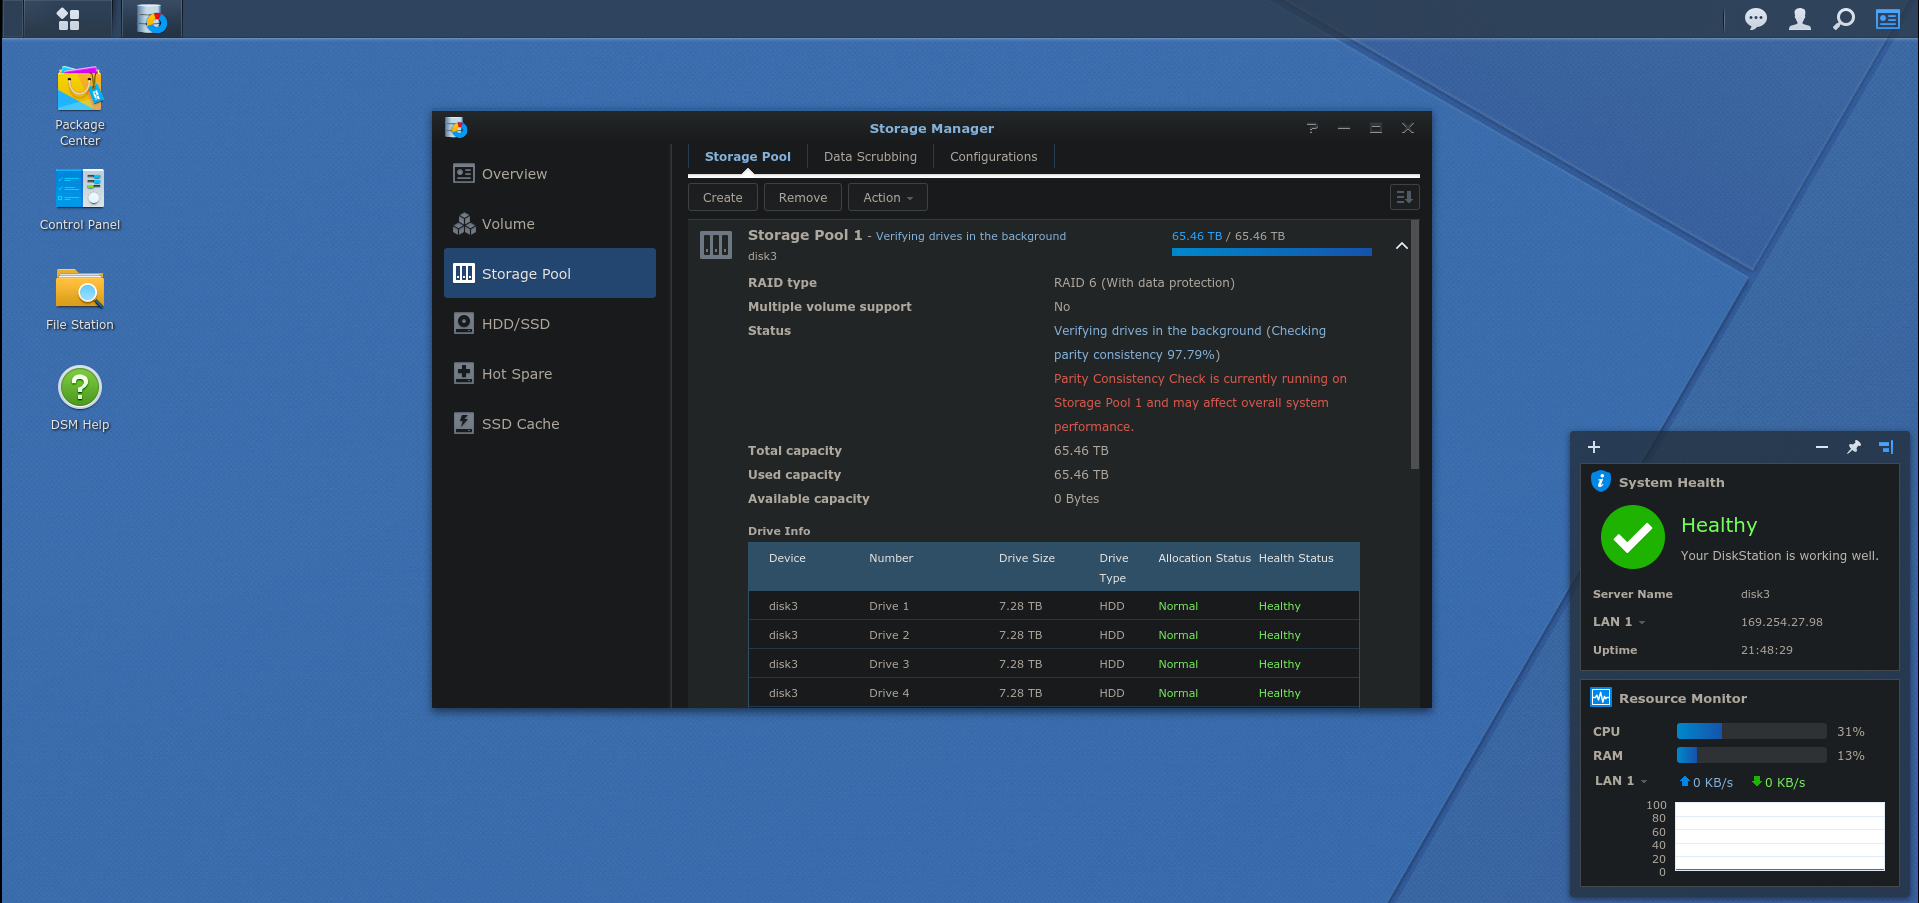
- Create a “Storage Pool” which is analogous to a RAID array on any other system.
- Create a “Volume” which is analogous to a partition on the array on any other system.
That’s all there is to creating and partitioning the RAID array. What’s left is to configure access to it from other machines.
System (de)configuration
Synology has a lot of neat consumer-oriented features that would make this device very useful as shared storage in a home setting, including interfacing to Mac and Windows machines, hosting media streaming servers, etc.
None of this applies to my use case, so I skimmed through the “File Services” menu under “Control Panel” and turned off everything (most of which is on-by-default) except the NFS (v3) server, which was off by default.
Next I configured the proper network settings (including assigning a static IP, e.g. 192.168.9.57) under the “Network” menu of “Control Panel”.
Then from the “Shared Folder” menu of “Control Panel” I could create a folder on my newly created “Volume” and change the last tab “NFS Permissions” to add a new rule for the cluster to access the “Shared Folder” via an NFS mount.
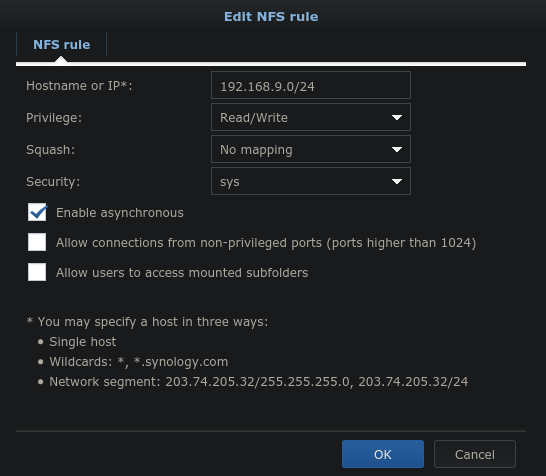
The Synology NFS permissions window.
Critical here is the allowed IP range. All machines in the local subnet 192.168.9.0/24 should get full read/write access. Usually one would synchronize the UID/GID of all cluster user accounts onto a NFS server or remap them in some intelligent way to server-managed accounts. Even though Synology devices are Linux under the hood, they’ve made creative use of UIDs, which means standard user accounts on an existing cluster would conflict with system users. That’s not ideal, and for a multi user system, neither is (s)quashing all accounts to one account, so I went with “no mapping”. The security option “sys” essentially means that the client-reported UID/GID will be checked server-side before actually reading/writing data. This is fine for trusted clients (on the local network) that already have synchronized UID/GID. An added bonus here is that the UID/GID of cluster user accounts will be naturally associated with files as they are created by users on the NFS share without the Synology operating system needing to know how these map to account or group names.
NFS permission fiddling
Of course, the security/permission interface in Synology was designed assuming the Synology device knows all the potential users, and that the received UID/GID from NFS access actually exist on the Synology device. By default, this means an unknown UID will have no access using the “No mapping” dropdown menu selection from the previous section. There were several options to get this working:
- Painstakingly add every cluster user manually via this fancy GUI interface. (No thanks!)
- Set up Kerberos to handle authentication of users cluster-wide. (Again, no!)
- Disable server-side access control lists.
The last option seems like a bad idea, but it’s actually quite fine for this use case where access is only via NFS from trusted clients. Basically, the linux system will still check that the reported UID/GID has permission to read/edit a particular file according to standard UNIX permissions, which is exactly the behavior I want from an NFS server. Disabling the access control list only stops the NFS server for confirming these UID/GID are known to the server and map to accounts created from the GUI, which I don’t care about.
The problem, of course, is there’s no way from the GUI to disable the access control lists entirely.
Instead, this can be done by connecting to the Synology DSM via ssh after enabling the ssh server on the “Terminal & SNMP” menu of “Control Panel”.
After that, ssh in with the user created when the DSM was first installed, and remove the ACL from the “Shared Folder”.
Here my “Shared Folder” is called disk3 and it is located at /volume1/disk3/ presumably because I put disk3 on “Volume 1” via the web interface.
sudo synoacltool -del /volume1/disk3
This will leave /volume1/disk3 in mode 755 owned by root:root so that only the root user on NFS clients can create new files at the root of the share.
This can be changed to meet the use case, up to and including specifying UIDs that do not exist on the Synology device numerically.
For the cluster, all users historically have the ability to create (and delete!) files on the disk machines, so I set mode 777 on that folder.
sudo chmod 777 /volume1/disk3
Now cluster machines can mount the NFS share with access controlled by UNIX permissions, as the web interface has already configured the NFS server exports correctly.
mount -t nfs -o vers=3 192.168.9.57:/volume1/disk3 /nfs/disk3
Monitoring with Nagios
Synology had several monitoring options on the “Notification” menu of “Control Panel” that were various levels of gimmicky.
(Paid SMS services, or routing emails through Synology’s own infrastructure? Really?)
Slack notification via Nagios informing me all is good on the new Synology servers.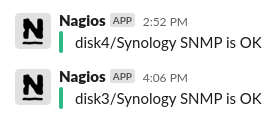
A positive conclusion
Start to finish, it took more time to write this blog post than configure the Synology NAS (after installing the drives). Compared to even Enterprise-class solutions, like the T640 DELL servers we have in the cluster, this is pretty attractive. So far, the Synology NAS have met all of our requirements, and for half the price of our previous solutions, so I’d definitely recommend these for the O(100TB) scale of data storage. Time will tell how reliable these are, so check back in a few years to see if I’ve got any complaints.
>> Home